- About
- Getting Started
- How To?
- CSS & JS
- Structure
- WPBakery Page Builder
- Widgets
- Credits
- Changelog
- Support
MediCenter - Health Medical Clinic Theme
MediCenter is a responsive WordPress theme suitable for medical or health related projects or businesses. Theme is maintained in a minimalist and modern style with strong blue accents. Theme comes with wide and boxed layout - both fully responsive and optimized for all kind of devices.
PSD source files are available to all of our buyers. Please contact us to get the files. You will receive perfectly organized and layered Template plus all of the icons used within a project in full PSD vector.
Theme Features
- Responsive Design
- jQuery Powered
- Full Width and Boxed Page Layouts
- Page Builder with 40+ Components
- 5 Demos to import: Main, Pregnancy, Ophthalmologist, Veterinary, Dentist
- 6 Predefined Color Skins
- Build in Color Picker to Customize the Theme Colors
- 20+ Page Layouts
- 6 Homepage Layouts
- Customizable Theme Option Panel
- Build-In Schedule (Timetable) Manager
- CSS3 Compare Pricing Tables for WordPress (Value of $27) Included
- Slider Revolution Responsive WordPress Plugin (Value of $109) Included
- WPBakery Page Builder for WordPress (Value of $99) Included
- WooCommerce Integration
- Departments
- Blog With Comments
- Unlimited Sidebars
- Different Gallery Layouts
- Ajax Appointment Form
- Map of Location
- Sticky Menu
- 105 Premium Font Based Featured Icons Included
- 33 Font Based Social Icons Included
- 800+ Fonts Variants to Choose
- Fully Customizable
- Latest Tweets
- Support For Videos
- Font Face Fonts
- Retina Ready
- Valid HTML5 code
- Crossbrowser Compatible
- Clean Design
- Documentation Included
Instructional Videos
- Activate and automatic dummy-content Import,
- Activate and manual dummy-content Import, you will need for this 2 free plugins: WodrPress Importer and Widget Settings Importer/Exporter
- Build a page with WPBakery Page Builder in 5 minutes
- Build a home page
- Set The Timetable
- Set Theme Options and Configure Widgets
Please note: For importing dummy-content from live preview/demo page you need two files: dummy-data.xml and widget_data.json. You can find both in zip archive downloaded from ThemeForest.
Need HTML (non - WordPress) version?
There is also HTML version of this theme available. You can find it here: MediCenter Health Medical Template
Getting Started
1. Downloading theme archive
To install MediCenter on your WordPress website, you need to download the theme archive file from your Downloads section on ThemeForest. Downloaded archive will look like this 'themeforest-4718613-medicenter-responsive-medical-wordpress-theme.zip'. Please unzip this file and inside you will find 'medicenter.zip' archive (screenshot) which contains all theme files necessary to install the theme.
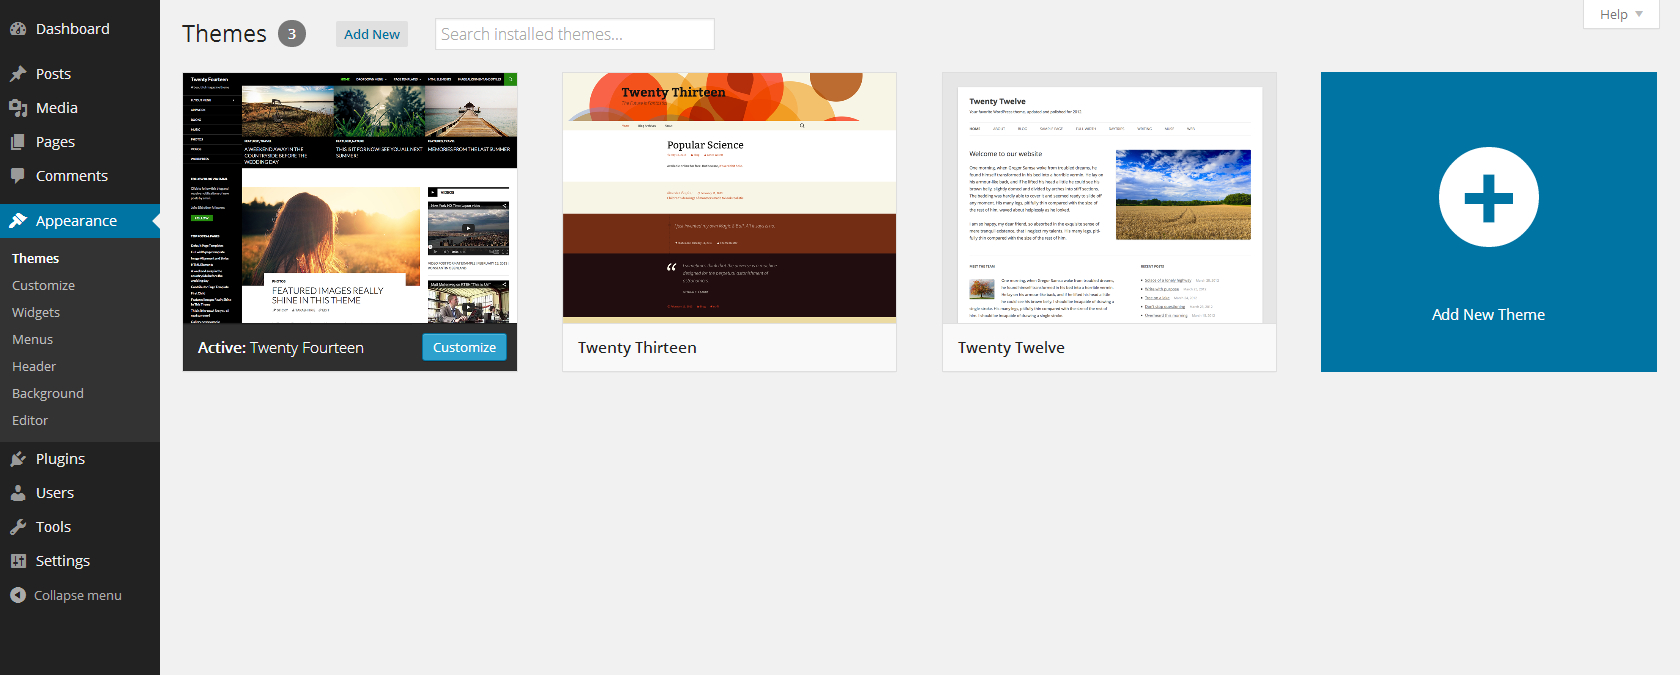
2. Theme installation
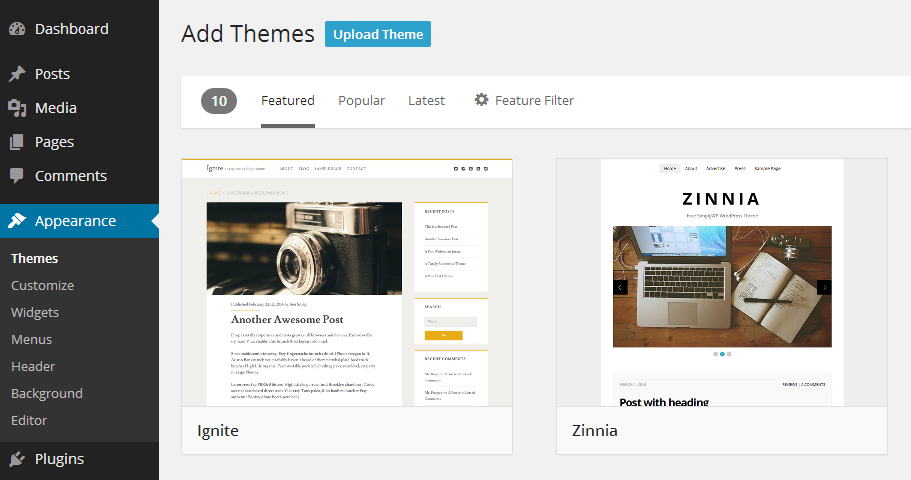
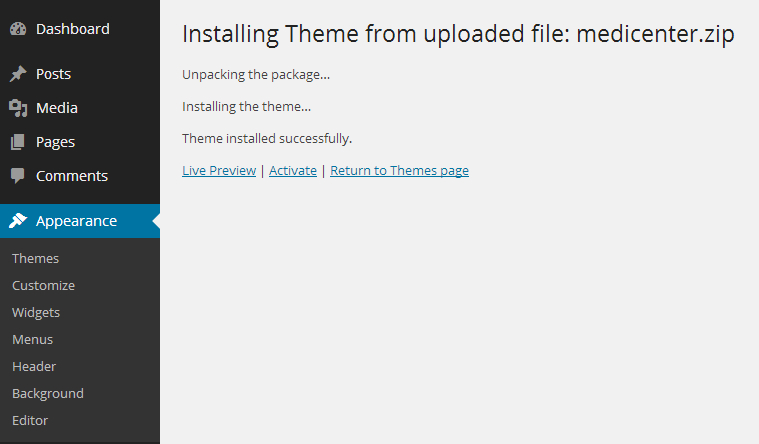
Please login to your WP dashboard and go to 'Appearance->Themes' panel, over there you can use the 'Add New Theme' option to install new themes. Click on 'Upload Theme' button located at the top left corner of the screen (near the 'Add Themes' page title, screenshot) and select the 'medicenter.zip' file from your computer, now use the 'Install Now' button and if everything goes right, you should notice 'Theme installed successfully' message (screenshot), after that you can activate the theme.
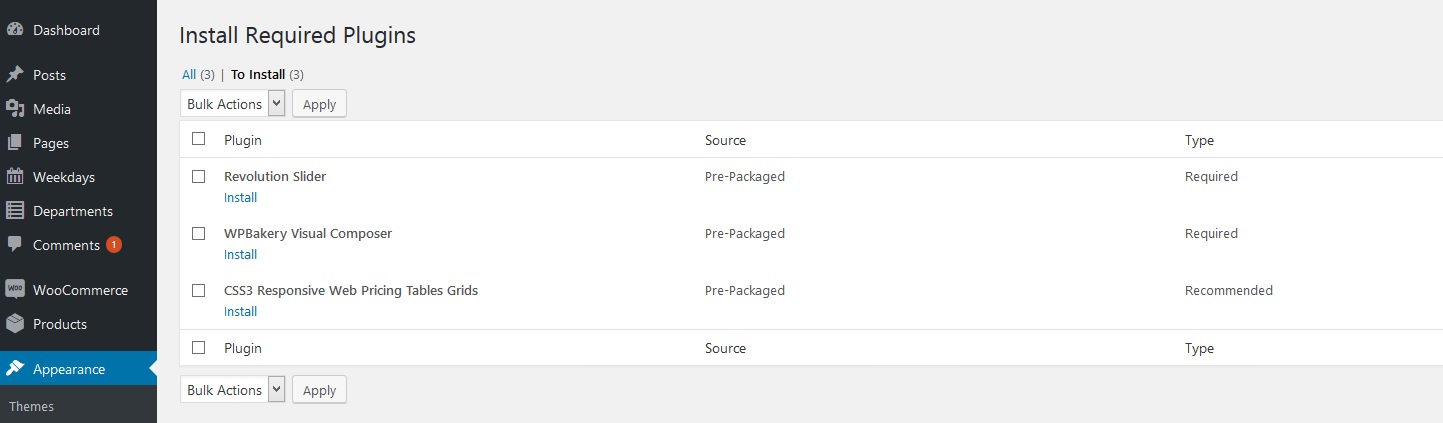
3. Plugins installation
Once the theme is active, you need to install required plugins, you can do that in 'Appearance->Install Plugins' panel. After installation please activate plugins.
4. Dummy data import
The last thing is to import the dummy data, this will create sample content and configure your WordPress settings, making your website look exactly as in our preview version. This step is optional, you don't need to install dummy content if you don't need it but it will help you to see how content has been configured on demo site, you can also take it as a base for your customized website. To do this, please go to 'Appearance->Theme Options' panel and click on 'Import dummy content' button, please remember that this can take some time, so you should wait until the confirmation message is displayed (screenshot). After that, your website will be ready and now you can start adding your own content or customize the theme. All steps from the dummy content process can be viewed on this instructional video.
How To?
1. How to install MediCenter theme?
Please read our Getting Started guide, it presents step-by-step instructions on how to install the theme. Alternatively you can install theme manually. In that case please connect with your FTP account using FTP client like FileZilla and now upload the unpacked theme directory to the 'wp-content/themes/' subdirectory, after that, you can activate it in Themes panel of WP dashboard.
2. What is the correct way to update the theme?
Theme update doesn’t affect your website/theme settings, also the content like: posts, pages, etc. will remain the same.
1. Download the latest theme version from ThemeForest downloads page.
2. If you have modified the theme or plugin files, then you need to create a backup, this way you won’t loose your changes.
3. Now switch to default WordPress theme and remove old theme (if you use child theme, then only remove the parent theme).
Theme includes the following plugins: WPBakery Page Builder, Slider Revolution, CSS3 Pricing Tables, if you notice in the update changelog that a new version of plugin is available, then in WP dashboard you should deactivate and remove it.
4. Now install and activate new theme version, optionally you can install plugin updates in 'Appearance->Install Plugins' panel.
5. If you were using child theme, then you can activate it now.
6. If your old theme/plugins were modified, then now you can use the backup files to apply the changes once again in the theme/plugin files.
We suggest to keep all custom modifications inside the child theme, this way the update process is much simpler. You can find more on this here: support.quanticalabs.com/fo…
Alternatively you can update the theme manually by uploading new files using FTP connection.
Please unpack the downloaded theme archive, login to your FTP account using FTP client (e.g. FileZilla) and replace the current theme files by uploading the newest ones. If your theme has custom modifications then you can upload only those files which were changed in theme update, you can check those files in the update changelog. This way you can keep most(or even all) of your modifications after the update.
3. How can I update the WPBakery Page Builder plugin?
Firstly you must update your theme to the latest version, which includes new version of WPBakery Page Builder plugin.
Now it’s necessary to delete old version of WPBakery Page Builder plugin, to do this please temporarily activate default WordPress theme (e.g. Twenty Fifteen) and visit Plugins panel, deactivate/delete "WPBakery Page Builder" plugin and once again activate MediCenter theme.
If you use WordPress MultiSite installation, then just go to 'Network->Plugins' panel and delete the 'WPBakery Page Builder' plugin. Login once again to your website dashboard and you will be asked to install the VC plugin, follow the instructions and the update will be complete.
Alternatively you can make an update via FTP file manager. Please login to your FTP account and go to 'wp-content/plugins/' subdirectory and delete entire 'js_composer/' folder, after that visit your WordPress dashboard. You should notice new message at the top of a screen, that asks you to install the required plugin, follow the instructions and the WPBakery Page Builder plugin will be installed.
4. How can I setup a Child Theme?
To setup a child theme please first install the theme and import dummy data, instructions can be found here. Now please download this child theme archive support.quanticalabs.com/wp… and install/activate it in WordPress Themes panel. The name of the child theme is ‘Medicenter Child’ and it is possible that WordPress will deactivate widgets and main menu, so you will need to re-assign them in Widgets and Menus panel. After that your child theme should be working correctly. More details about Child Themes can be found here: https://codex.wordpress.org/Child_Themes
5. How can I translate the theme?
Theme supports translations. To create your language translation, please download this usefull tool Poedit. Then find in languages directory default.po file and open it in Poedit.
Translate appropriate texts and save the file giving it appropriate name (check here for more). For example French: fr_FR, German: de_DE, etc.
Once the translation is finished, you must visit 'Settings->General' panel in your WordPress Dashboard and set language in 'Site Language' option.
6. How can I control the single post layout?
If you have imported dummy content you should see 'Single post template' page under 'Pages' admin menu. Please edit it using WPBakery Page Builder editor to control single post layout.
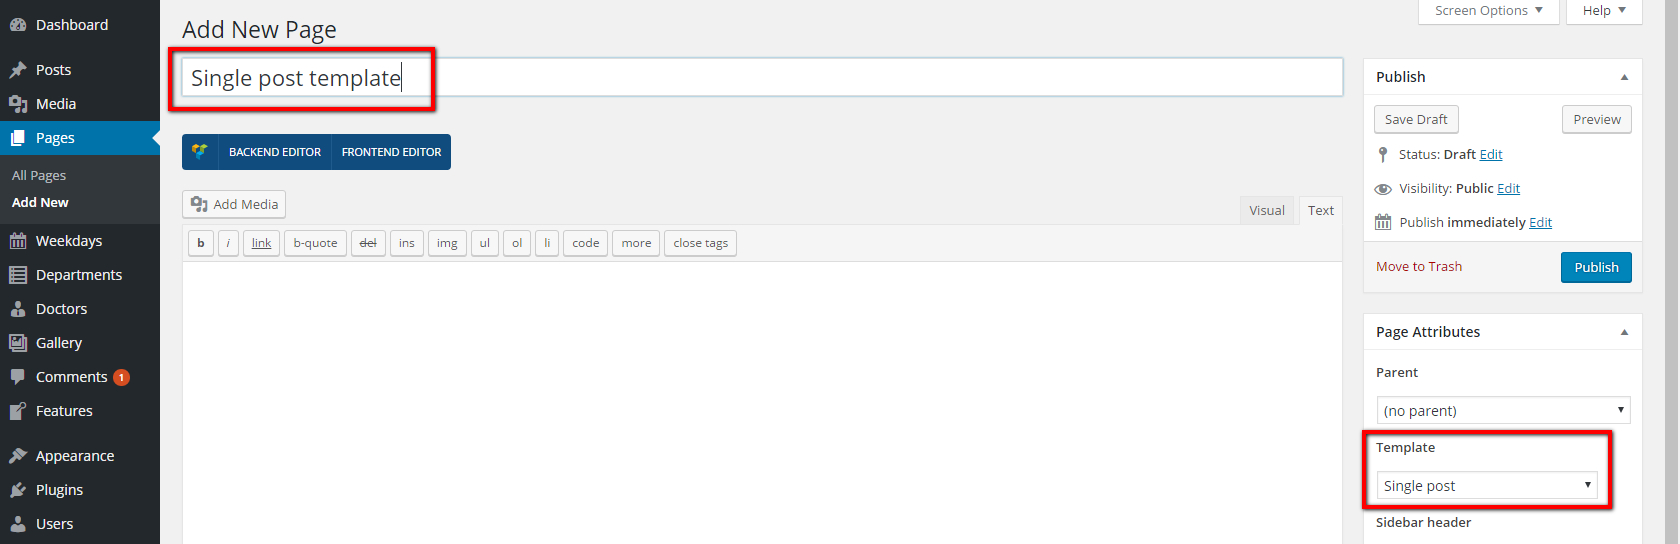
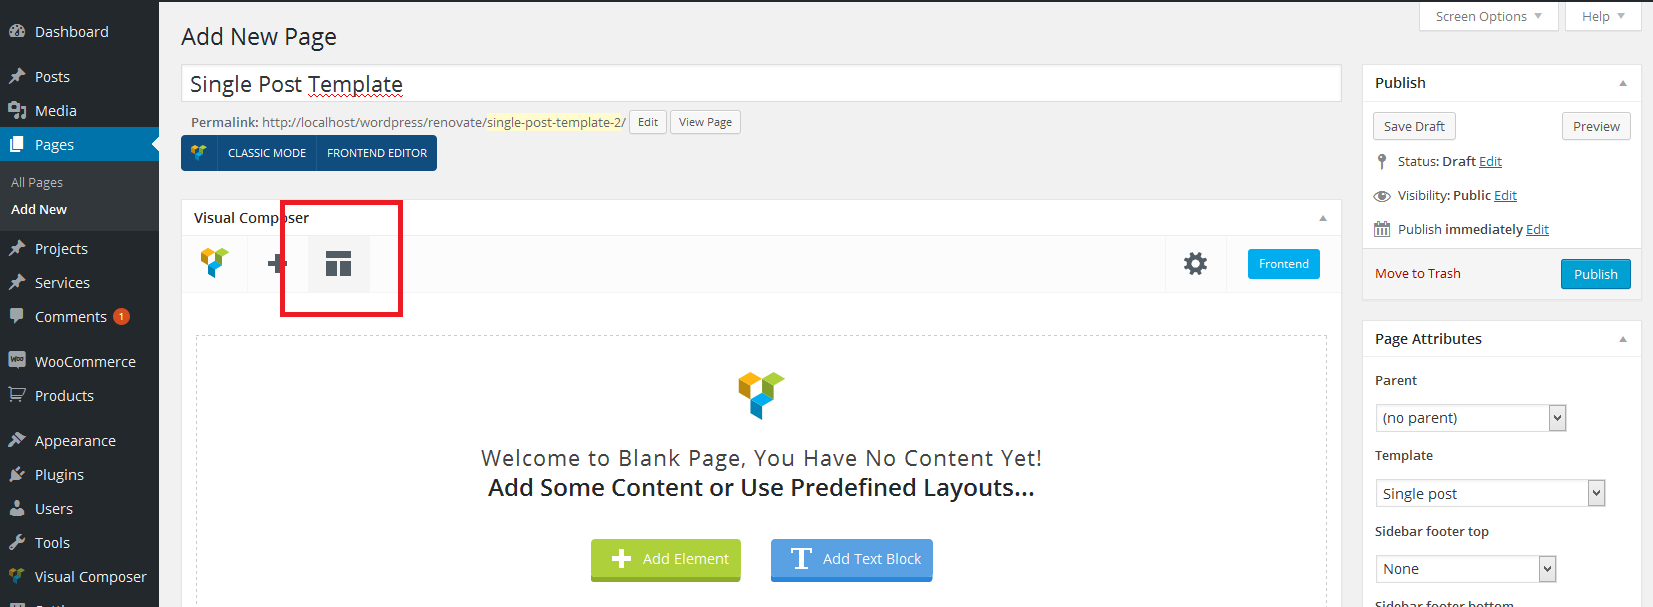
If you haven't imported dummy content you can create this template from scratch. To do that please add new page: 'Pages->Add New'. Name it 'Single post template' and select 'Single post' template for it under 'Page Attributes' box (screenshot). After that please switch content editor to WPBakery Page Builder by clicking 'Backend Editor' button and click on 'Templates' button (screenshot).
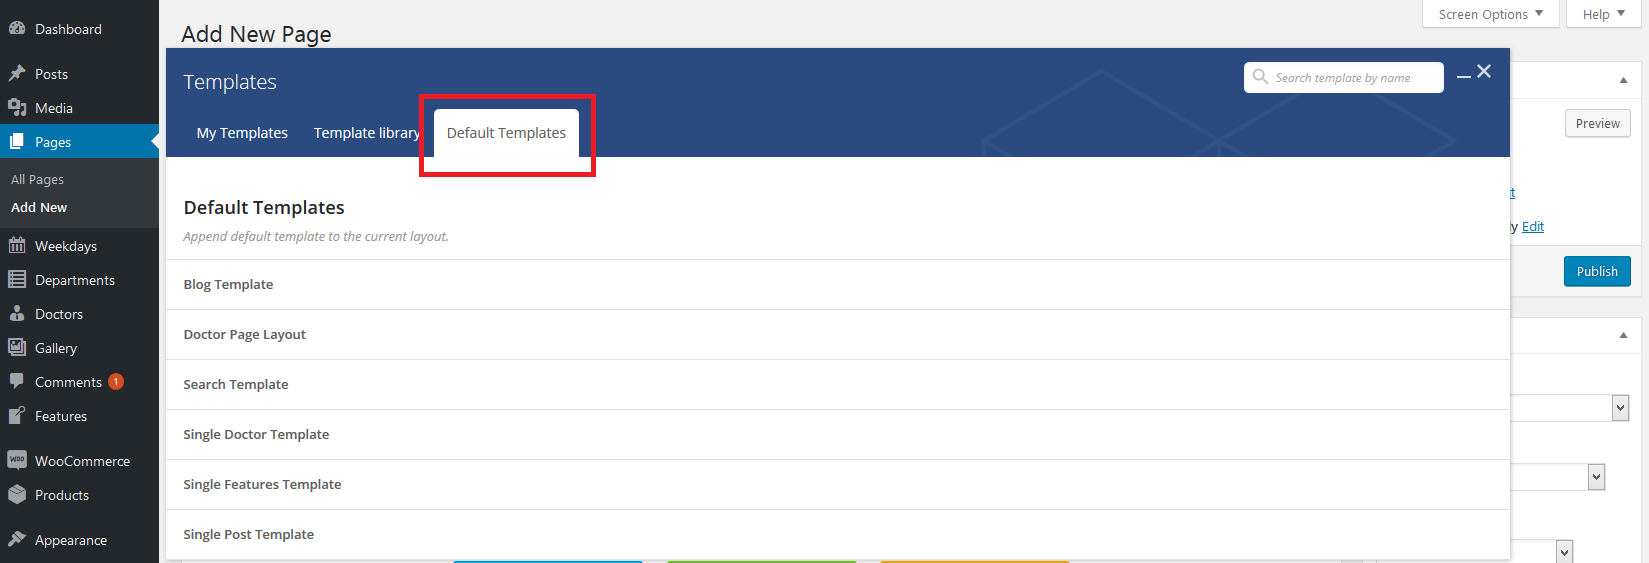
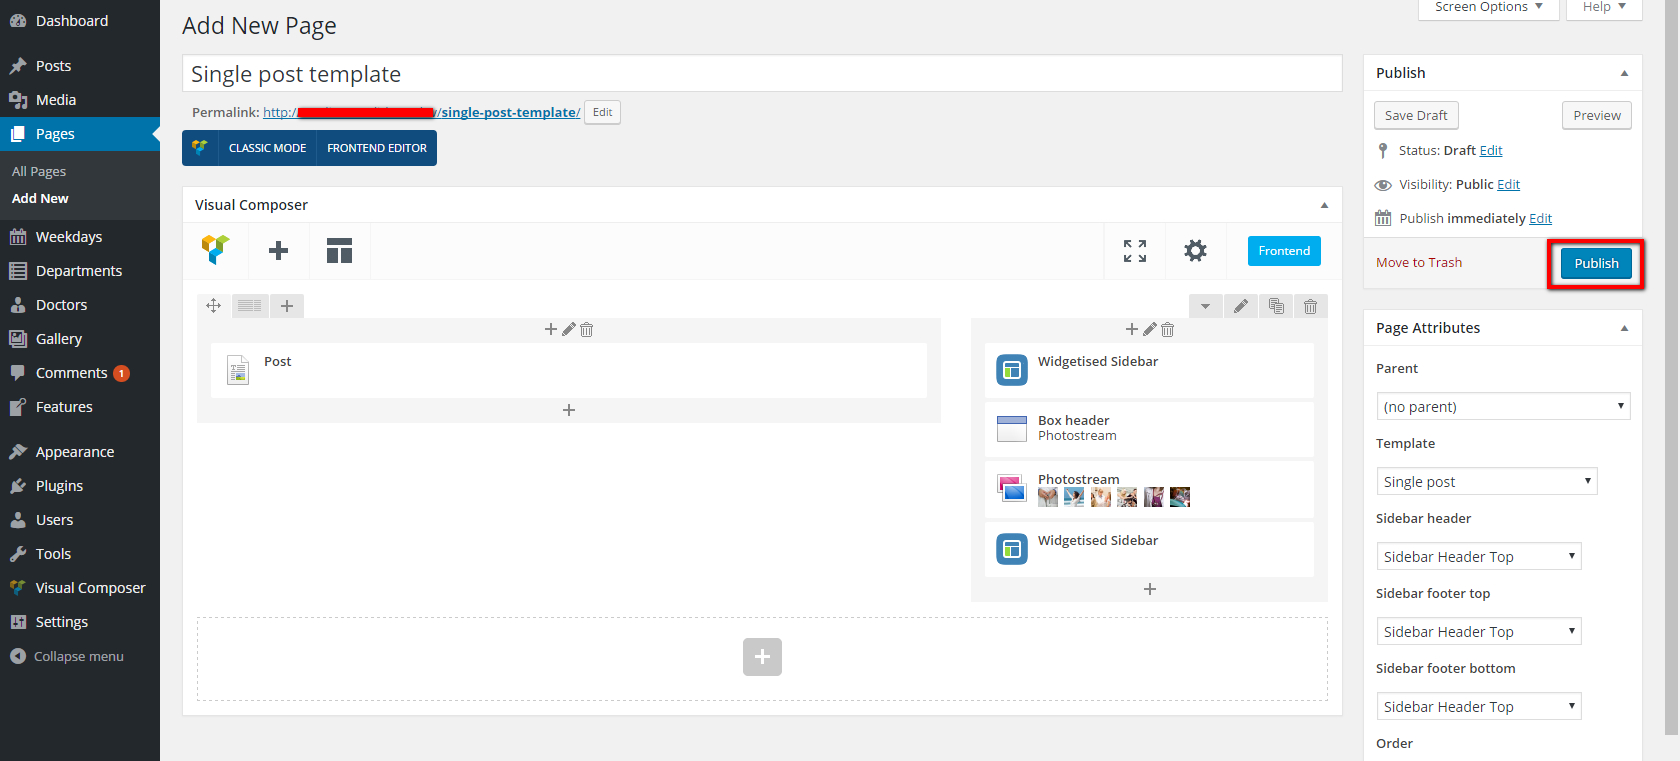
The templates popup will be displayed, please select 'Default templates' tab from it (screenshot). Find 'Single Post Template' on the list and add it to your page. Template is ready, please publish it (screenshot) and from now you can edit it to control single post layout.
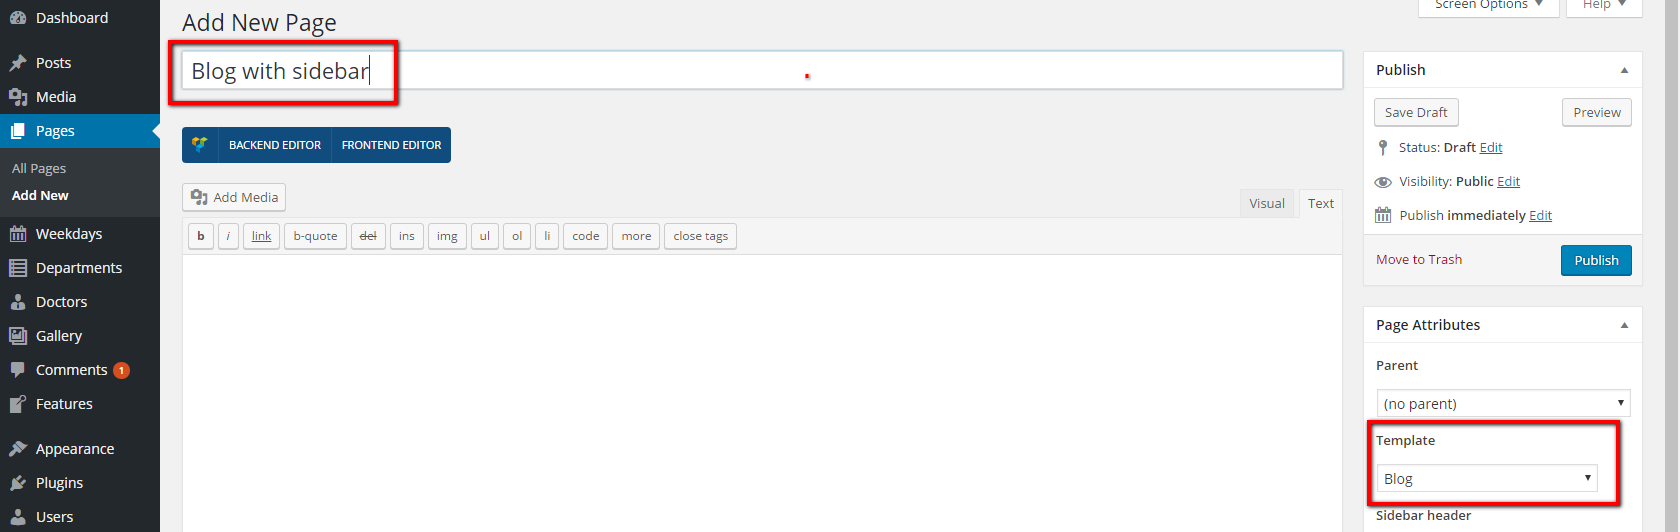
7. How can I control the blog layout?
If you have imported dummy content you should see 'Blog with sidebar' page under 'Pages' admin menu. Please edit it using WPBakery Page Builder editor to control blog layout.
If you haven't imported dummy content you can create this template from scratch. To do that please follow the instructions from point 6 (How can I control the single post layout?) but name the page 'Blog with sidebar' and select 'Blog' template for it under 'Page Attributes' box (screenshot). Please also use the 'Blog Template' as base for it from 'Default Templates' list (screenshot).
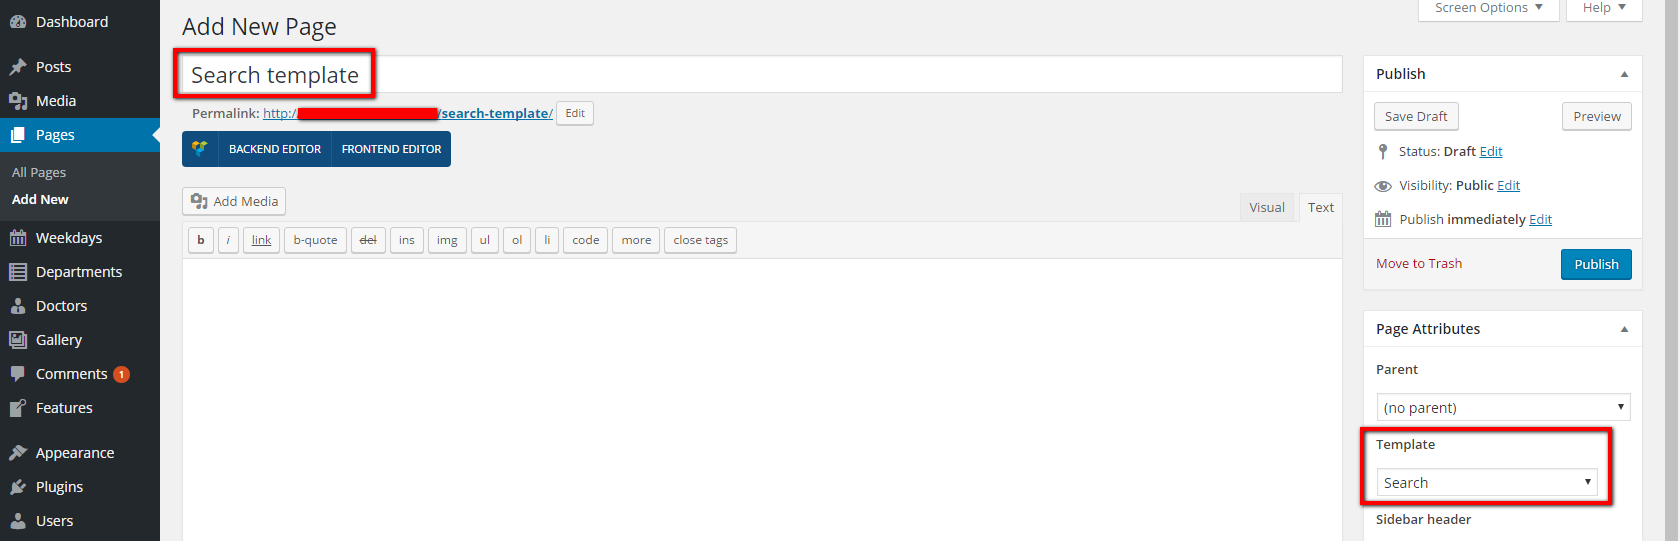
8. How can I control the search results page layout?
If you have imported dummy content you should see 'Search template' page under 'Pages' admin menu. Please edit it using WPBakery Page Builder editor to control search results page layout.
If you haven't imported dummy content you can create this template from scratch. To do that please follow the instructions from point 6 (How can I control the single post layout?) but name the page 'Search template' and select 'Search' template for it under 'Page Attributes' box (screenshot). Please also use the 'Search Template' as base for it from 'Default Templates' list (screenshot).
9. How can I control the single doctor page layout?
If you have imported dummy content you should see 'Single doctor template' page under 'Pages' admin menu. Please edit it using WPBakery Page Builder editor to control single doctor page layout.
If you haven't imported dummy content you can create this template from scratch. To do that please follow the instructions from point 6 (How can I control the single post layout?) but name the page 'Single doctor template' and select 'Doctor' template for it under 'Page Attributes' box (screenshot). Please also use the 'Single Doctor Template' as base for it from 'Default Templates' list (screenshot).
10. How can I control the single features page layout?
If you have imported dummy content you should see 'Single features template' page under 'Pages' admin menu. Please edit it using WPBakery Page Builder editor to control single features page layout.
If you haven't imported dummy content you can create this template from scratch. To do that please follow the instructions from point 6 (How can I control the single post layout?) but name the page 'Single features template' and select 'Single features' template for it under 'Page Attributes' box (screenshot). Please also use the 'Single Features Template' as base for it from 'Default Templates' list (screenshot).
11. What steps should I take after update from version 8.3 and lower?
MediCenter from version 9.0 is not fully backward compatible. We've added many improvements in code and for the layouts. So if you were using version 8.3 or lower and you have just updated theme, please follow below steps:
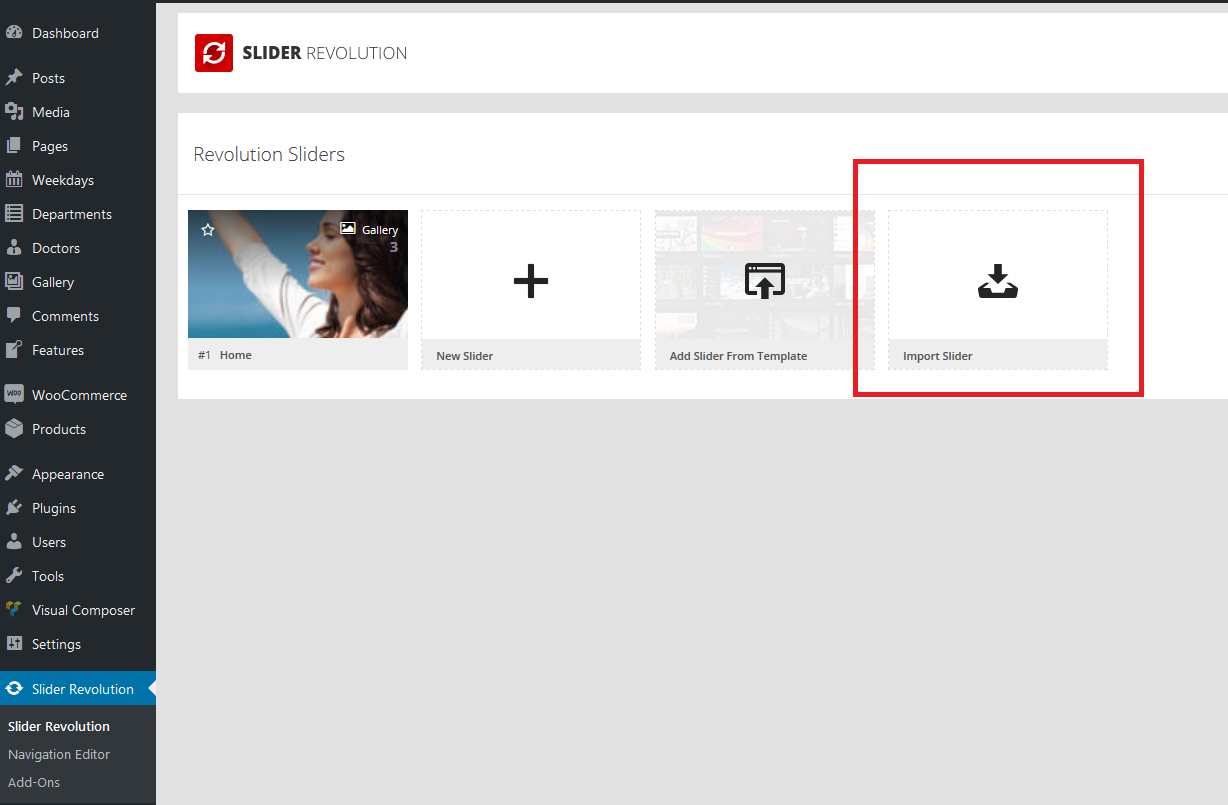
1. Home Slider has been replaced with Slider Revolution plugin. You can import new slider under 'Slider Revolution' menu in admin area (screenshot). For import, please use home.zip file which you will find in 'dummy content files' directory in the theme package downloaded from ThemeForest.
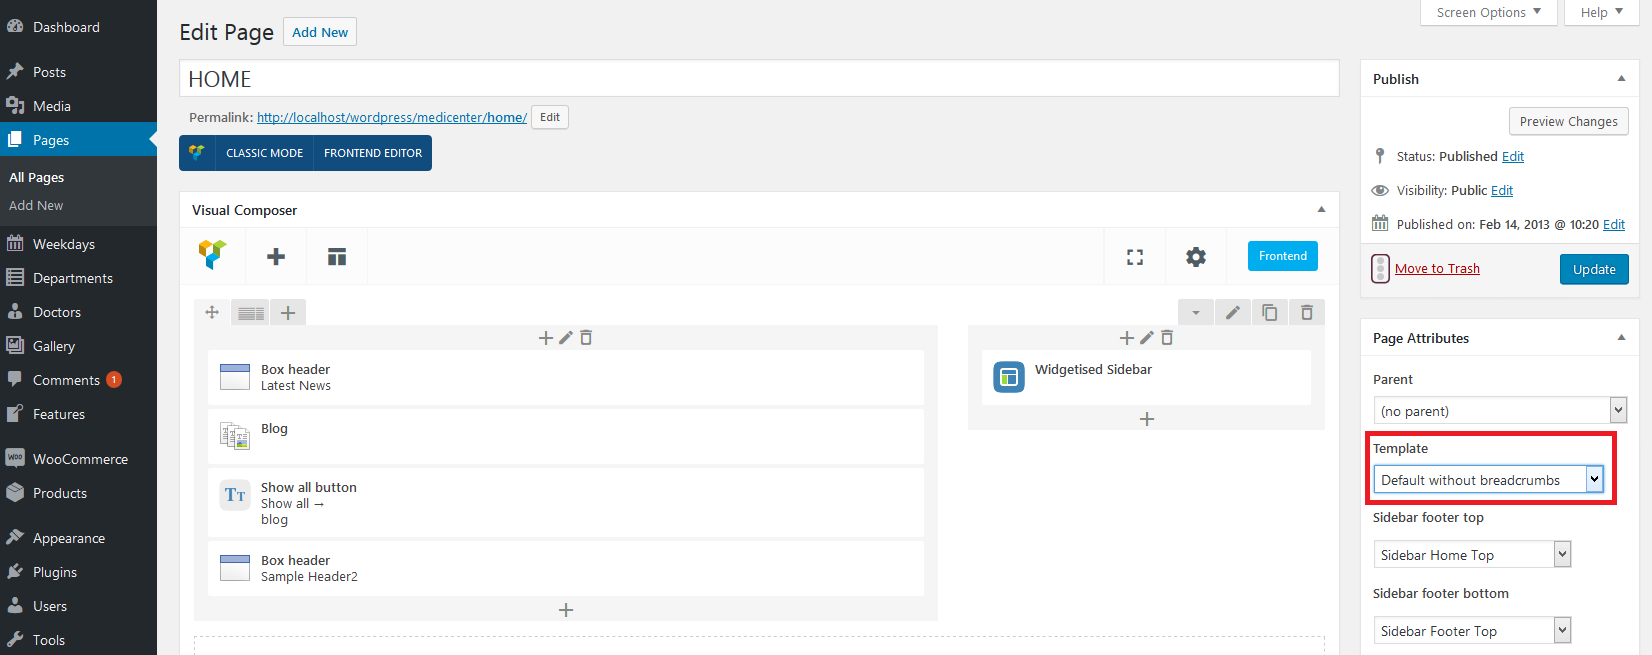
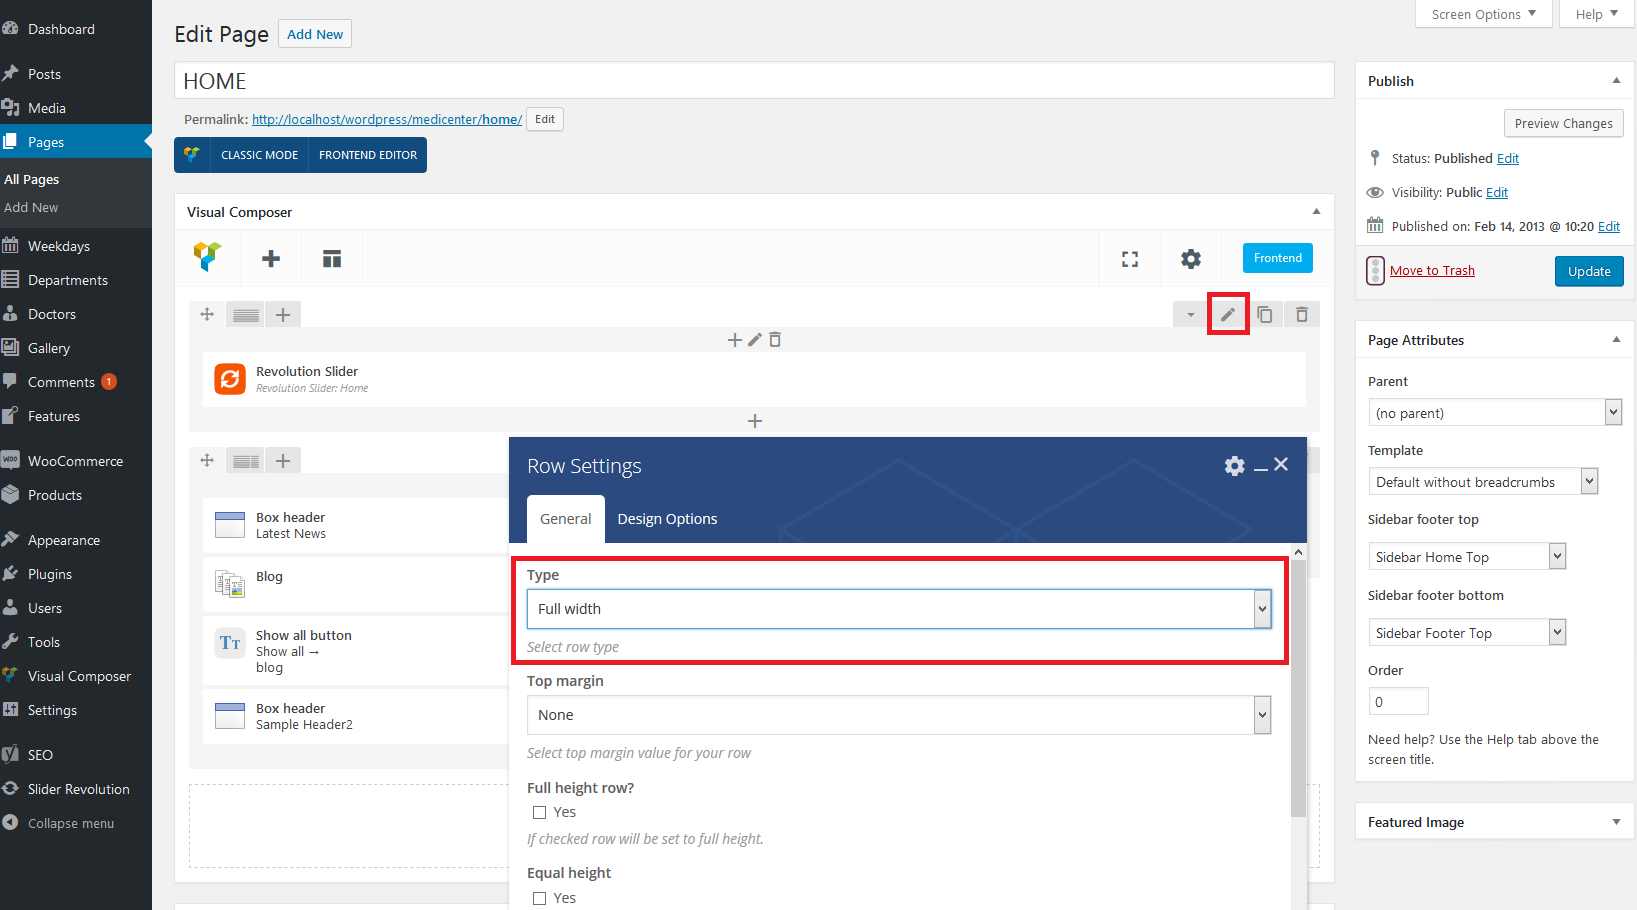
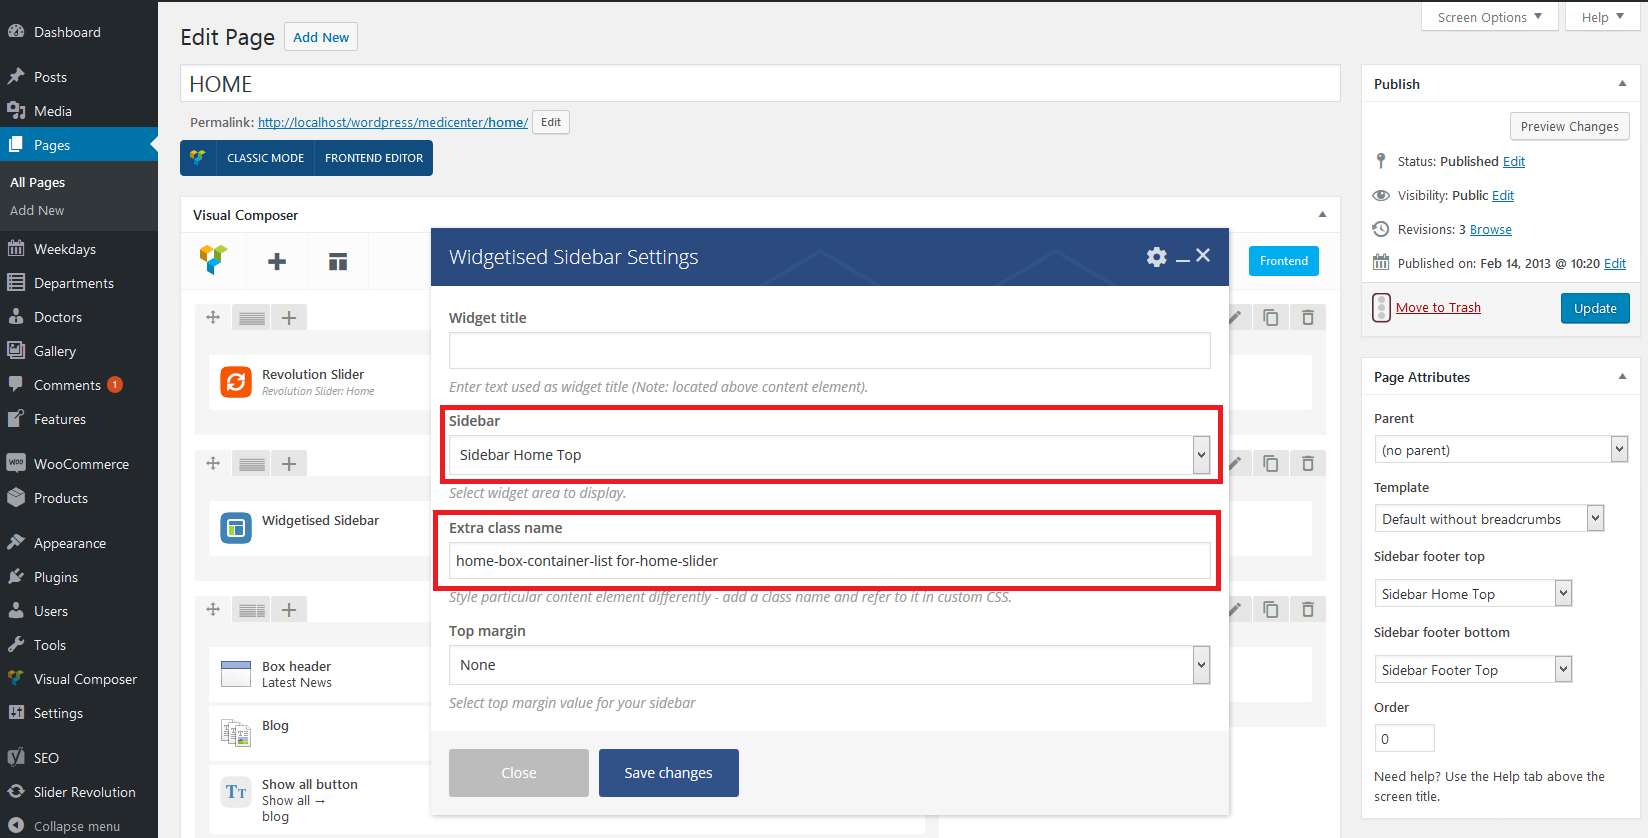
After the import please open your home page for edit and set the 'Template' for it to 'Default without breadcrumbs' (screen). Then please add new row in the content editor and insert 'Revolution Slider' component to it. In the row settings, please set 'Full width' type (screenshot). If you would like to have sidebar with home boxes on the slider, please add another row and insert 'Widgetised Sidebar' component to it. In the 'Widgetised Sidebar' component settings, please choose 'Sidebar Home Top' and set home-box-container-list for-home-slider in the 'Extra class name' field (screenshot). That's all, now your slider should look like the one on the demo site.
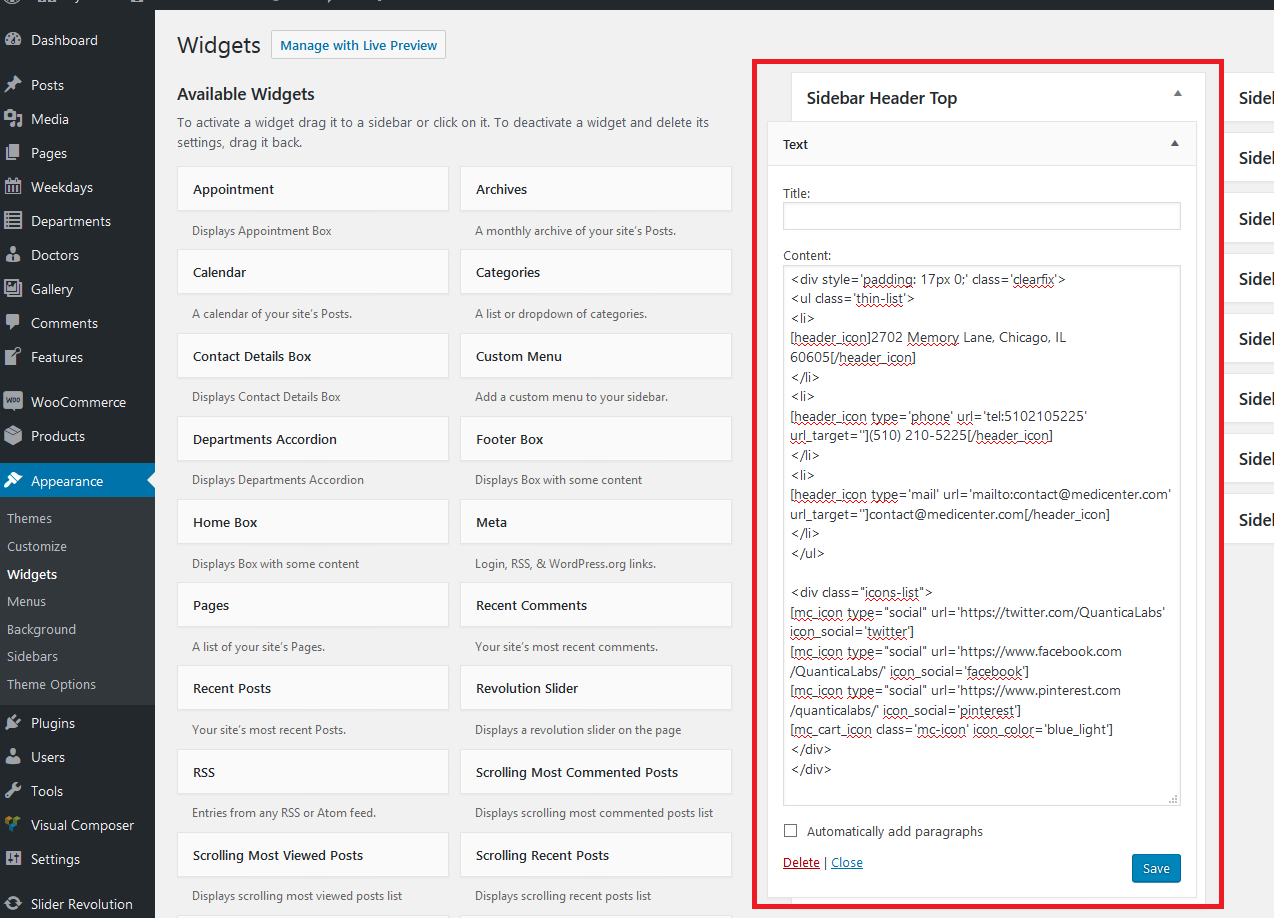
2. The default code for 'Text' widget in 'Sidebar Header Top' has been changed (screenshot). The new code below:
<div style='padding: 17px 0;' class='clearfix'>
<ul class='thin-list'>
<li>
[header_icon]2702 Memory Lane, Chicago, IL 60605[/header_icon]
</li>
<li>
[header_icon type='phone' url='tel:5102105225' url_target=''](510) 210-5225[/header_icon]
</li>
<li>
[header_icon type='mail' url='mailto:[email protected]' url_target=''][email protected][/header_icon]
</li>
</ul>

<div class="icons-list">
[mc_icon type="social" url='https://twitter.com/QuanticaLabs' icon_social='twitter']
[mc_icon type="social" url='https://www.facebook.com/QuanticaLabs/' icon_social='facebook']
[mc_icon type="social" url='https://www.pinterest.com/quanticalabs/' icon_social='pinterest']
[mc_cart_icon class='mc-icon']
</div>
</div>
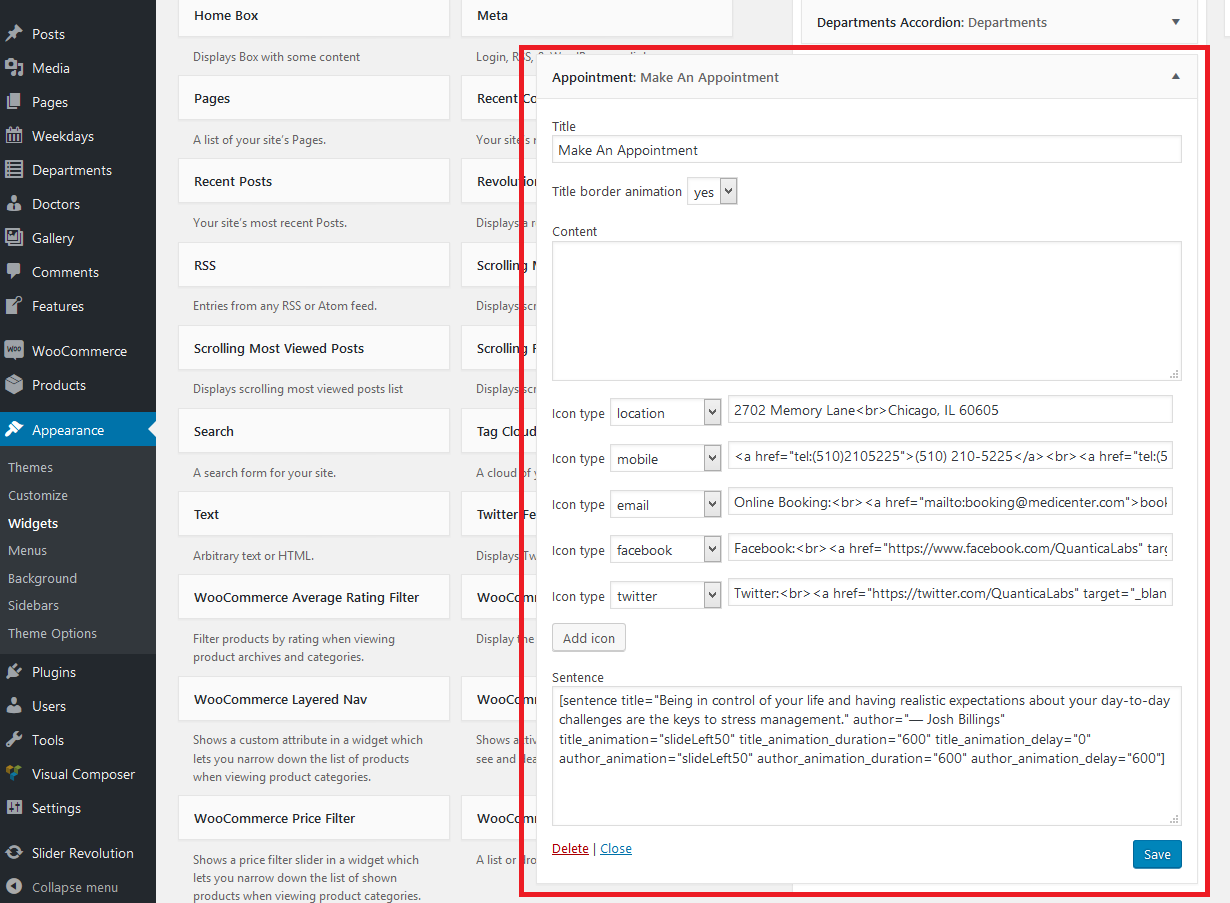
3. The config for 'Appointment' widget has been changed. Please check new on this screenshot.
4. The config for 'Footer Box' widget has been changed. Please check new on this screenshot.
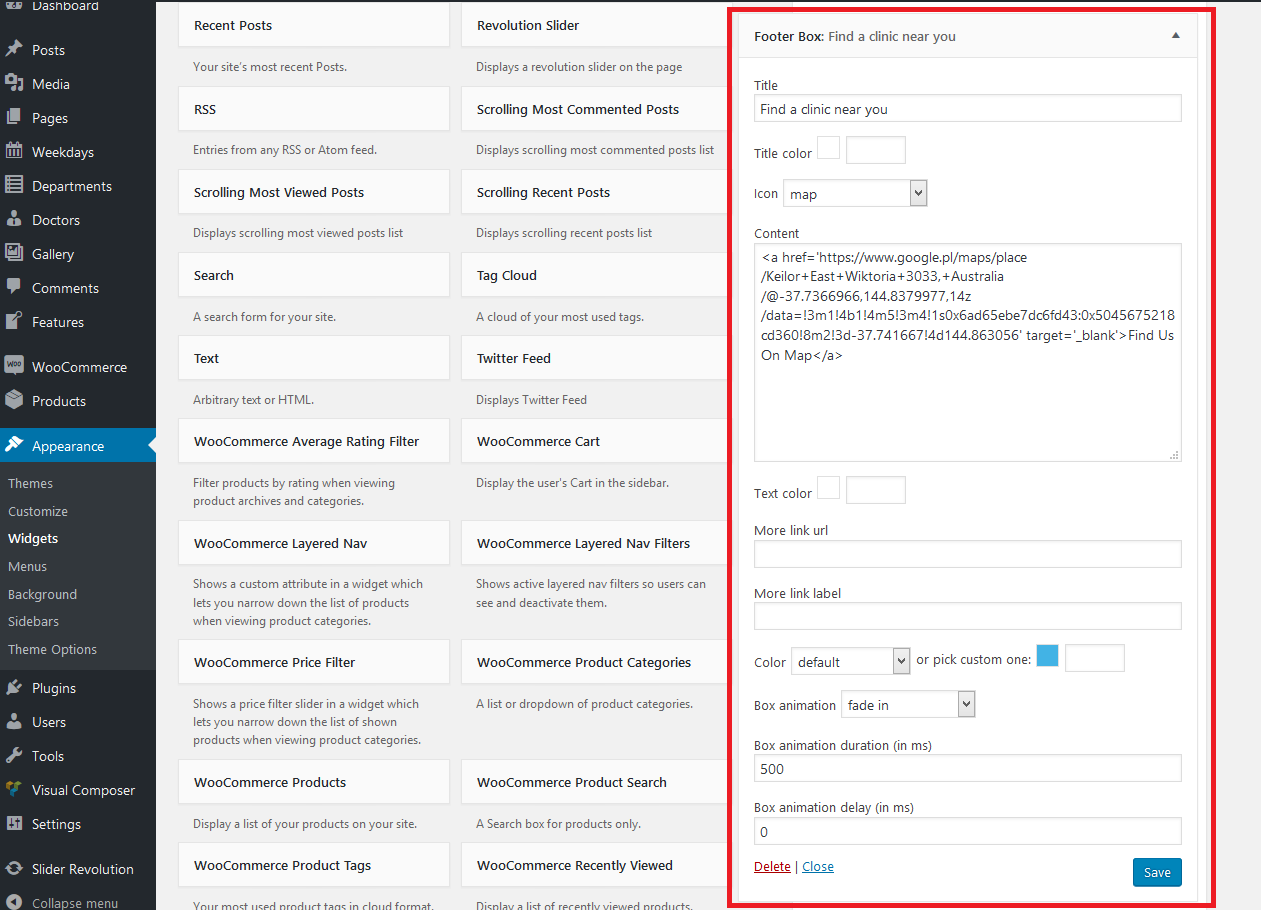
5. Sidebar Footer Bottom is displaying 4 columns now instead of 3. If you would like to have 4 columns there, please go to 'Apperance->Sidebars' and choose 'Sidebar Footer Bottom' for edit. Then set below values in the configuration (screenshot):
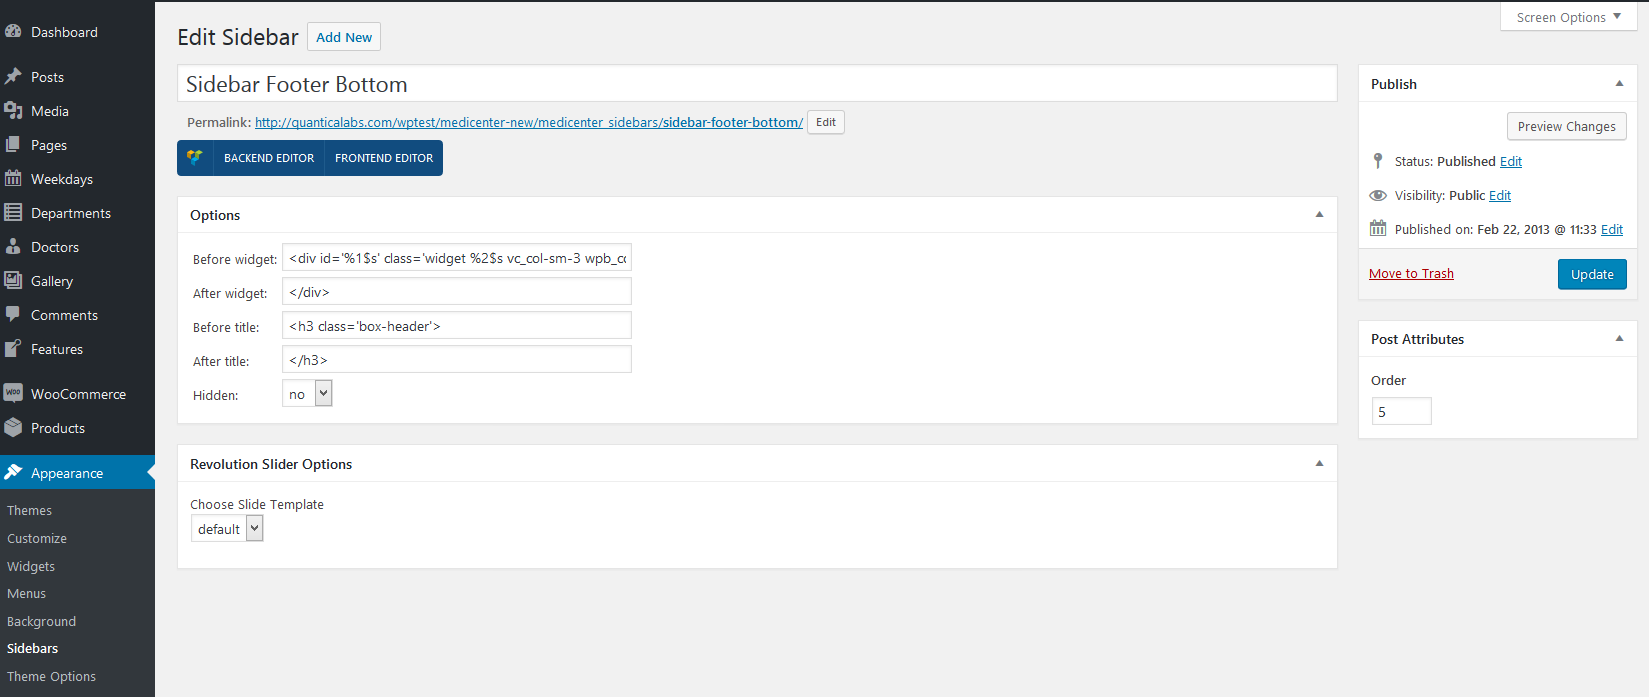
'Before widget':
<div id='%1$s' class='widget %2$s vc_col-sm-3 wpb_column vc_column_container'>'After widget':
</div>'Before title':
<h3 class='box-header'>'After title':
</h3>
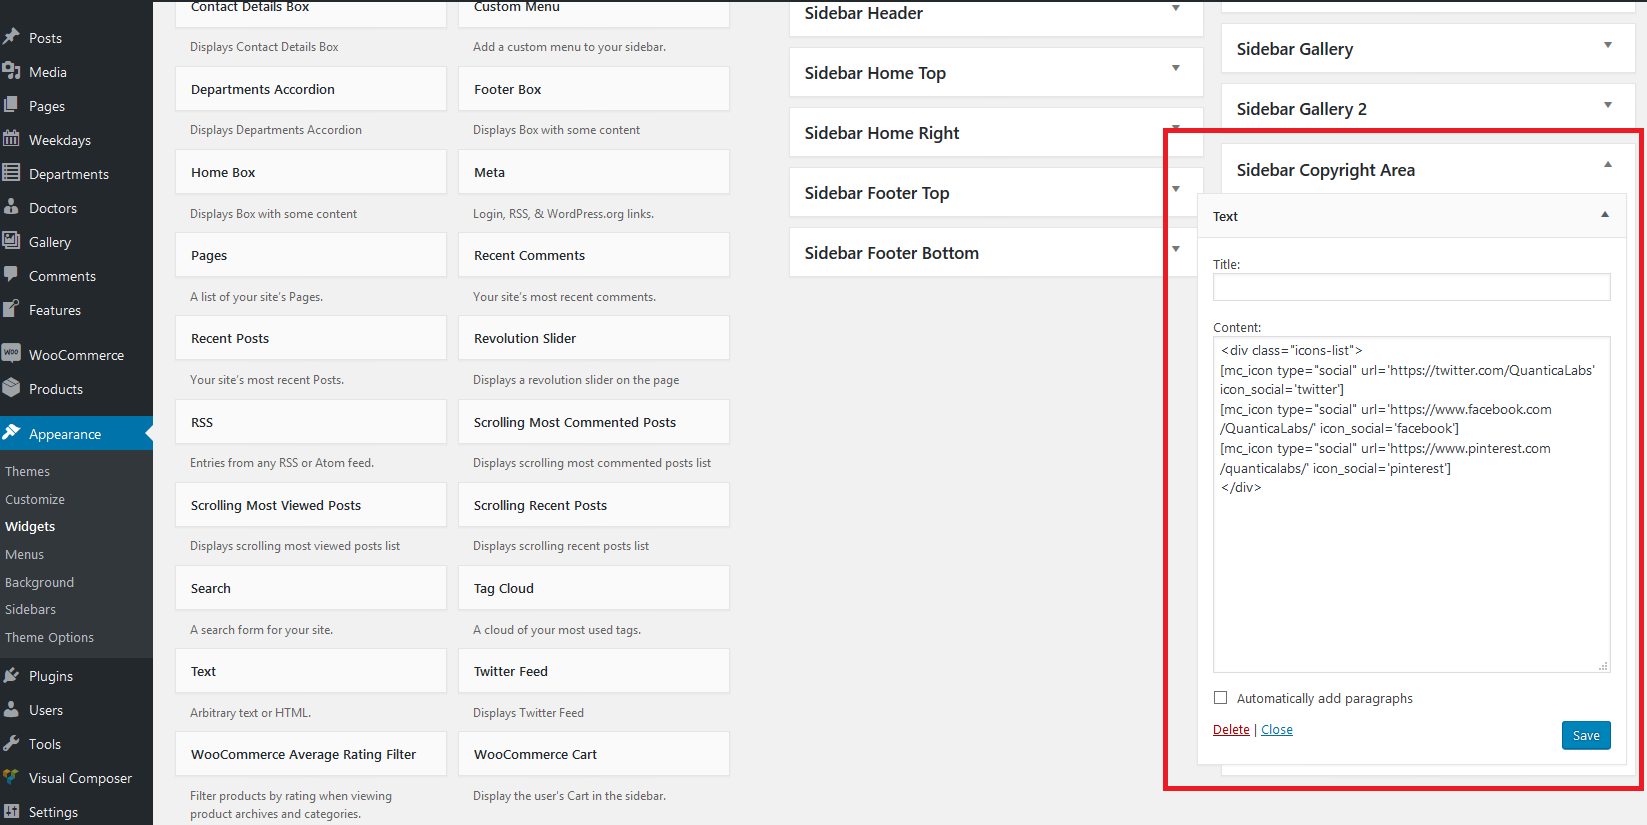
6. There is new 'Sidebar Copyright Area' available. Please add it under 'Apperance->Sidebars' and name it 'Sidebar Copyright Area'. Then you will see it under 'Apperance->Widgets': (screenshot). Below the code used for it by default:
<div class="icons-list">
[mc_icon type="social" url='https://twitter.com/QuanticaLabs' icon_social='twitter']
[mc_icon type="social" url='https://www.facebook.com/QuanticaLabs/' icon_social='facebook']
[mc_icon type="social" url='https://www.pinterest.com/quanticalabs/' icon_social='pinterest']
</div>
7. There is new menu location available - 'Footer Menu'. You can set a menu for it under 'Apperance->Menus->Manage Locations'.
8. There are new icons for 'Features' available. Please check all your features items under 'Features' in admin area and set the icons for them if necessary.
12. Have another questions?
Please check the FAQ section on our Support Forum.
CSS Styles
The project uses the following cascade of theme styles (in order):
- animations.css - styles for animated elements,
- jquery.qtip.css - default styles for tooltips (overwritten in style.css),
- superfish.css - default styles for superfish menu,
- prettyPhoto.css - default styles for prettyPhoto lightbox,
- style.css - base styles for the entire project,
- responsive.css - styles for responsive design (you can disable it under Appearance->Theme Options),
- reset.css - styles which resets default browsers styles.
Javascript Files
Plugins and library
- jQuery Easing v1.3 - https://gsgd.co.uk/sandbox/jquery/easing/,
- Isotope v2.2.0 - An exquisite jQuery plugin for magical layouts https://isotope.metafizzy.co,
- jQuery blockUI v2.70 - https://malsup.com/jquery/block/,
- qTip2 - Pretty powerful tooltips, https://craigsworks.com/projects/qtip2/,
- jQuery prettyPhoto v3.1.6 - Simple lightbox alternative, http://www.no-margin-for-errors.com/projects/prettyphoto-jquery-lightbox-clone/,
- jQuery timeago - Plugin that makes it easy to support automatically updating fuzzy timestamps, https://timeago.yarp.com/,
- jQuery BBQ v1.2.1, Plugin which provide support for browser histry, http://benalman.com/projects/jquery-bbq-plugin/,
- jQuery carouFredSel v6.2.1 - https://github.com/Codeinwp/carouFredSel-jQuery.
Other files
- jquery.hint.js - script which supports hints on form inputs,
- main.js - script contains all executable instructions of jquery plugins, events handlers etc.,
- jquery.sliderControl.js - script which supports slide function for images in home slider and posts.
Theme Structure
Project is divided by four main files: index.php, header.php, footer.php and functions.php
index.php
It's main project file which calls other. It contains get_header and get_footer calls.
header.php
The file contains head section of the html tree structure. You can find here also wp_head call.
footer.php
The file contains bottom part of the page, including copyright area and footer area. You can find here also wp_footer call.
functions.php
The file contains definition/includes of the functions for:
- widgets,
- shortcodes,
- sidebars,
- ajax calls,
- load javascript and css files,
- base configuration,
- menu generation,
- custom meta box and options pages.
WPBakery Page Builder
WPBakery Page Builder documentation is available here.
Widgets
There are 10 build in widgets:
- Home Box,
- Footer Box,
- Appointment,
- Departments Accordion,
- Contact Details Box,
- Scrolling Most Commented Posts,
- Scrolling Most Viewed Posts,
- Scrolling Recent Posts.
- Twitter Feed,
- Cart Icon.
Credits
Fonts used
- Open Sans By Steve Matteson, Apache License, version 2.0
https://fonts.google.com/specimen/Open+Sans, - Source Sans Pro By By Paul D. Hunt, SIL Open Font License, 1.1
https://fonts.google.com/specimen/Source+Sans+Pro, - PT Serif By ParaType, SIL Open Font License, 1.1
https://fonts.google.com/specimen/PT+Serif, - Streamline Icon Font (105 Icons)
https://www.webalys.com/, - Template Icon Font By Multiple Designers, MIT License,
- Social Icon Font By Multiple Designers, MIT License.
Images
Premium images you can use along with this Theme without asking permission (available with demo content):
- Pretty Young Female With Arms Raised Standing On Beach By Yuri_Arcurs
https://photodune.net/item/pretty-young-female-with-arms-raised-standing-on-beach/185895, - Pediatrician examine child throat cold prevention By CandyBoxImages
https://photodune.net/item/pediatrician-examine-child-throat-cold-prevention/2501412, - Surgeon By ollyi
https://photodune.net/item/surgeon/2360366, - Fitness young woman on gym bike spinning By CandyBoxImages
https://photodune.net/item/fitness-young-woman-on-gym-bike-spinning/350646, - Girl on lavender field By Grekov
https://photodune.net/item/girl-on-lavender-field/3237910, - Vintage travel By stokkete
https://photodune.net/item/vintage-travel/2943271, - Gladness By Pressmaster
https://photodune.net/item/gladness/361817.
Images under Creative Commons Attribution 2.0 Generic (CC BY 2.0) for Commercial Use (available with demo content):
- Nurse By Walt Stoneburner
https://www.flickr.com/photos/waltstoneburner/3373248256/, - SilviaAtWork By Conor Lawless
https://www.flickr.com/photos/conchur/1572262745/, - 111111 By florianplag
https://www.flickr.com/photos/florianplag/6334717309/, - The StethoscopeBy Alex E. Proimos
https://www.flickr.com/photos/proimos/6869336880/.
Premium images used for live preview purpose (not included in downloadable package):
- Healthy mother and baby girl running on beach By citalliance
https://123rf.com/photo_38981278_healthy-mother-and-baby-girl-running-on-beach-rear-view.html, - Happy senior man and woman couple walking or dancing and holding hands on a deserted tropical beach By dmbaker
https://123rf.com/photo_45607956_happy-senior-man-and-woman-couple-walking-or-dancing-and-holding-hands-on-a-deserted-tropical-beach.html, - Dentist in uniform talking with patient in dental clinic By lightfieldstudios
https://123rf.com/photo_76708487_dentist-in-uniform-talking-with-patient-in-dental-clinic.html, - Exercise. Cheerful male patient lying down with female smiling physiotherapist performing some stretch exercises on mans leg By Dmytro Zinkevych
https://123rf.com/photo_58312521_exercise-cheerful-male-patient-lying-down-with-female-smiling-physiotherapist-performing-some-stretc.html, - Young Optometrist measuring patients eye pressure with tonometer By Tyler Olson
https://123rf.com/photo_25630672_young-optometrist-measuring-patients-eye-pressure-with-tonometer.html, - Young woman in the medical laboratory By Goran Bogicevic
https://123rf.com/photo_27924739_young-woman-in-the-medical-laboratory.html, - Young female eye doctor determines eyes diopter using instruments in consulting room By luckybusiness
https://123rf.com/photo_52135815_young-female-eye-doctor-determines-eyes-diopter-using-instruments-in-consulting-room.html, - Professional male rheumatologist examining a girls hand By Viacheslav Iakobchuk
https://123rf.com/photo_76857726_professional-male-rheumatologist-examining-a-girls-hand.html, - Family of four on wooden jetty by the ocean By Maksym Topchii
https://123rf.com/photo_12696646_family-of-four-on-wooden-jetty-by-the-ocean.html, - Happy young mother with newborn baby in hospital after giving birth By Anna Nahabed
https://123rf.com/photo_88786428_happy-young-mother-with-newborn-baby-in-hospital-after-giving-birth.html, - Midsection of female lab tech loading specimen for coagulation test analysis By Tyler Olson
https://123rf.com/photo_25302151_midsection-of-female-lab-tech-loading-specimen-for-coagulation-test-analysis.html, - Preparation for blood test with pretty blond girl by female doctor in white coat medical uniform... By Иван Река
https://123rf.com/photo_42628724_preparation-for-blood-test-with-pretty-blond-girl-by-female-doctor-in-white-coat-medical-uniform-on-.html, - Hands of a lab technician with a tube of blood sample and a rack with other samples By angellodeco
https://123rf.com/photo_59194963_hands-of-a-lab-technician-with-a-tube-of-blood-sample-and-a-rack-with-other-samples-lab-technician-h.html, - Back view of happy young family - mother, father and son having fun on the beach By Maksym Topchii
https://123rf.com/photo_18542240_back-view-of-happy-young-family-mother-father-and-son-having-fun-on-the-beach.html, - Portrait of mother and little daughter on the beach By sborisov
https://123rf.com/photo_54802342_portrait-of-mother-and-little-daughter-on-the-beach.html.
Pregnancy Demo images (not included in downloadable package):
- Home portrait of pregnant woman
https://stock.adobe.com/pl/images/home-portrait-of-pregnant-woman/71593673, - hand doctor obstetrician doing the ultrasound of the abdomen
https://stock.adobe.com/pl/images/hand-doctor-obstetrician-doing-the-ultrasound-of-the-abdomen/185276356, - Mother with her 2 month old baby
https://stock.adobe.com/pl/images/mother-with-her-2-month-old-baby/197606777, - Pregnant woman and doctor..
https://stock.adobe.com/pl/images/pregnant-woman-and-doctor/49464571, - Cute newborn baby girl shoes. Baby shower, birthday, invitation, greeting card
https://stock.adobe.com/pl/images/cute-newborn-baby-girl-shoes-baby-shower-birthday-invitation-greeting-card/218121682, - Mom breast feeding baby
https://stock.adobe.com/pl/images/mom-breast-feeding-baby/197606979, - 股にハートを持つ女性
https://stock.adobe.com/pl/images/%E8%82%A1%E3%81%AB%E3%83%8F%E3%83%BC%E3%83%88%E3%82%92%E6%8C%81%E3%81%A4%E5%A5%B3%E6%80%A7/276245882, - Pregnant woman in dress holds hands on belly on a white background. Pregnancy, maternity, preparation and expectation concept.
https://stock.adobe.com/pl/images/pregnant-woman-in-dress-holds-hands-on-belly-on-a-white-background-pregnancy-maternity-preparation-and-expectation-concept/275251779.
Ophthalmologist Demo images (not included in downloadable package):
- Ophthalmology lasik surgeon
https://stock.adobe.com/pl/images/ophthalmology-lasik-surgeon/86034693, - Ophthalmology laser
https://stock.adobe.com/pl/images/ophthalmology-laser/86034430, - Female eye doctor working in clinic and checking eyesight
https://stock.adobe.com/pl/images/female-eye-doctor-working-in-clinic-and-checking-eyesight/274015810, - Female optician and buyer chooses glasses frame
https://stock.adobe.com/pl/images/female-optician-and-buyer-chooses-glasses-frame/256065662, - Computer diagnostics of vision, choice of glasses
https://stock.adobe.com/pl/images/computer-diagnostics-of-vision-choice-of-glasses/231400137, - Row of eyeglass at an opticians store
https://stock.adobe.com/pl/images/row-of-eyeglass-at-an-opticians-store/136419174, - Diopter selection, glasses choice, eyesight test
https://stock.adobe.com/pl/images/diopter-selection-glasses-choice-eyesight-test/232751460, - Pediatric Doctor ophthalmologist checks vision of child boy. Concept selection of glasses lenses.
https://stock.adobe.com/pl/images/pediatric-doctor-ophthalmologist-checks-vision-of-child-boy-concept-selection-of-glasses-lenses/239725166, - Child reception doctor ophthalmologist selects glasses of lens, check eye sight.
https://stock.adobe.com/pl/images/child-reception-doctor-ophthalmologist-selects-glasses-of-lens-check-eye-sight/239725108, - Little girl and her mother vising the optical store
https://stock.adobe.com/pl/images/little-girl-and-her-mother-vising-the-optical-store/249768567, - Young girl doctor holding up patient special glasses for eye tests and selection of lenses. Little beautiful blonde boy
https://stock.adobe.com/pl/images/young-girl-doctor-holding-up-patient-special-glasses-for-eye-tests-and-selection-of-lenses-little-beautiful-blonde-boy/242535668.
Veterinary Demo images (not included in downloadable package):
- veterinarian examines a dog's teeth in vet clinic
https://stock.adobe.com/pl/images/veterinarian-examines-a-dog-s-teeth-in-vet-clinic/248663981, - Cat on a drip. Vet and animal concept
https://stock.adobe.com/pl/images/cat-on-a-drip-vet-and-animal-concept/135353567, - White dog standing on metal table in veterinary clinic
https://stock.adobe.com/pl/images/white-dog-standing-on-metal-table-in-veterinary-clinic/278444661, - Veterinarian Kissing Bird in Exam Room
https://stock.adobe.com/pl/images/veterinarian-kissing-bird-in-exam-room/227359839, - Cat having ultrasound scan in vet office.
https://stock.adobe.com/pl/images/cat-having-ultrasound-scan-in-vet-office/157528840, - veterinarian checks teeth to a cat.
https://stock.adobe.com/pl/images/veterinarian-checks-teeth-to-a-cat/157324013, - Female veterinary doctor giving injection for cute kitten
https://stock.adobe.com/pl/images/female-veterinary-doctor-giving-injection-for-cute-kitten/184217885, - Young veterinarian holding cat in clinic
https://stock.adobe.com/pl/images/young-veterinarian-holding-cat-in-clinic/199368710, - Cute young yellow labrador puppy
https://stock.adobe.com/pl/images/cute-young-yellow-labrador-puppy/231406843, - Portrait of a happy boy and his dog breed Jack Russell Terrier, who sit and cuddle on a gray bedspread over the bed and affectionately looking at his owner against the bokeh background of bright light
https://stock.adobe.com/pl/images/portrait-of-a-happy-boy-and-his-dog-breed-jack-russell-terrier-who-sit-and-cuddle-on-a-gray-bedspread-over-the-bed-and-affectionately-looking-at-his-owner-against-the-bokeh-background-of-bright-light/277742314, - Ill retriever in veterinary clinic.
https://stock.adobe.com/pl/images/ill-retriever-in-veterinary-clinic/106825488, - Vet doctor stroking and holding cute hamster.
https://stock.adobe.com/pl/images/vet-doctor-stroking-and-holding-cute-hamster/266558405, - The cat lies on the table under the X-ray machine. The doctor and assistant hold the cat's paws so that it does not move during the X-ray examination. Examination of the internal organs of a pet in a
https://stock.adobe.com/pl/images/the-cat-lies-on-the-table-under-the-x-ray-machine-the-doctor-and-assistant-hold-the-cat-s-paws-so-that-it-does-not-move-during-the-x-ray-examination-examination-of-the-internal-organs-of-a-pet-in-a/259789407, - Woman with a dog
https://stock.adobe.com/pl/images/woman-with-a-dog/264216242, - Veterinarian examining dog's heartbeat
https://stock.adobe.com/pl/images/veterinarian-examining-dog-s-heartbeat/94502100.
Dentist Demo images (not included in downloadable package):
- Young woman patient standing in x-ray machine.
https://stock.adobe.com/pl/images/young-woman-patient-standing-in-x-ray-machine/174997607, - Creative professional dentist giving her little patient a high five
https://stock.adobe.com/pl/images/creative-professional-dentist-giving-her-little-patient-a-high-five/143899367, - medicine, dentistry and healthcare concept - mother and son with toothbrush visiting dentist at dental clinic
https://stock.adobe.com/pl/images/medicine-dentistry-and-healthcare-concept-mother-and-son-with-toothbrush-visiting-dentist-at-dental-clinic/205416752, - Equipment and dental instruments in dentist's office. Dentist at work
https://stock.adobe.com/pl/images/equipment-and-dental-instruments-in-dentist-s-office-dentist-at-work/93628112, - Dentist equipment in office of dental clinic.
https://stock.adobe.com/pl/images/dentist-equipment-in-office-of-dental-clinic/255555240, - medicine, dentistry and healthcare concept - mother and son with toothbrush visiting dentist at dental clinic
https://stock.adobe.com/pl/images/medicine-dentistry-and-healthcare-concept-mother-and-son-with-toothbrush-visiting-dentist-at-dental-clinic/205416752, - lächelnde Frau in einer Zahnarztpraxis
https://stock.adobe.com/pl/images/lachelnde-frau-in-einer-zahnarztpraxis/276577614, - Zahnärztin schaut sich ein Röntgenbild an
https://stock.adobe.com/pl/images/zahnarztin-schaut-sich-ein-rontgenbild-an/276582224, - Portrait of a happy smiling teenage girl with dental braces and glasses
https://stock.adobe.com/pl/images/portrait-of-a-happy-smiling-teenage-girl-with-dental-braces-and-glasses/226194850, - Zahnärztin in ihrer Praxis
https://stock.adobe.com/pl/images/zahnarztin-in-ihrer-praxis/276581327, - Elegant mature bearded man with glasses
https://stock.adobe.com/pl/images/elegant-mature-bearded-man-with-glasses/226301809.
Changelog
Check the changelogSupport
Support for all our items is conducted through our Support Forum.
Please register an account and search the forum or create a new topic, we'll answer as soon as possible.
We're in GMT +1 and we aim to answer all questions within 24 hours (Monday – Friday). In some cases the waiting time can be extended to 48 hours.
Support requests sent during weekends or public holidays will be processed on next Monday or the next business day.
Need HTML (non - WordPress) version?
There is also HTML version of this theme available. You can find it here: MediCenter Health Medical Template